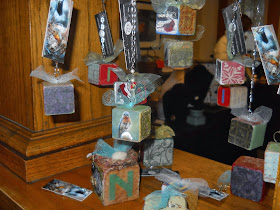
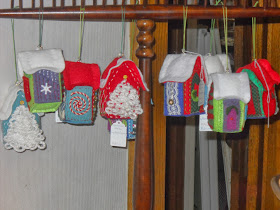
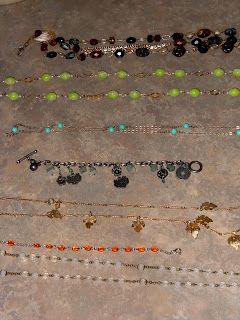
I got the artist's "sneak peak" this morning at the holiday sale. I have to say I was blown away! Megan and Gaines did an amazing job of display, lighting, and decorating. Ditto for the pottery gals downstairs. The quality and variety of the handmade items is spectacular; a literal feast for the eyes and nose - Thanks to Nancy's soaps, lotions, and balms. But I'll let the photos do the talking. Perhaps they'll tempt you to do a bit of your holiday shopping for a truly unique gift while supporting a local artist...
Friday, December 6, 2013
Saturday, November 16, 2013
Busy, Busy...
Since getting approval for my three ideas for the Holiday Sale at 212 Arts Center, I have been juggling quilting classes, mailing model horse orders for Shelby, canning (yes, we still have pears, apples, sweet potatoes, beets, and pumpkins to finish!), and my pojects for the sale.
So I began my own assembly line for my encaustic Christmas blocks...
Today I hit a sale at the Saline Senior Center and nabbed several old necklaces to use for the fobs on these ornaments.
I am so excited to be included in this sale. This is a first for me. The bonus is the fact that I get to create something everyday! Even if today that something is called Pear-Cherry Chutney!
Tuesday, November 5, 2013
Perfectly Balanced
I took a fantastic class today at 212 Arts Center - you're shocked I'm sure! Friday night Mike and I went to the WSG Gallery in Ann Arbor to view Valerie Mann's show, "The Real Cinderella Dress and other Recent Work" It was inspiring. Which brings me back to today's class...
Val Mann herself taught us how to create our own Calder-esque mobile. Everything we used was found or repurposed material - which I love. Since I also love rocks and have been collecting them for as long as I have been walking, I decided to use this for my inspiration.
I took this idea to a three dimensional form by cutting out various plastics, aluminum pans, old black rubber pieces, and screen in the shapes of rocks. Although it was difficult to photograph, here is what I came up with...
Val Mann herself taught us how to create our own Calder-esque mobile. Everything we used was found or repurposed material - which I love. Since I also love rocks and have been collecting them for as long as I have been walking, I decided to use this for my inspiration.
 | |
| My love of all things rocks and minerals led me to purchase this fabulous fabric :) |
I took this idea to a three dimensional form by cutting out various plastics, aluminum pans, old black rubber pieces, and screen in the shapes of rocks. Although it was difficult to photograph, here is what I came up with...
Tuesday, October 29, 2013
Waxing Alphabet Blocks
Garage sale finds are the best! It's like a treasure hunt every time. A few years ago, I snagged some old wooden alphabet blocks. I wasn't sure how I would use them, but I knew they were one of those lucky finds.
Since I've been waxing encaustic (pun intended!), I realized that these little blocks would make perfect canvases for some mini encaustic art pieces. Wax is heavy and brittle, which makes wood the perfect foundation. I literally felt a light bulb go off in my brain. I could create encaustic ornaments using my own photos for the 212 Art Center's Holiday Sale.
This is the story of the birth of my block ornaments. You've seen my first attempt with a larger block with the letter "N" on the front and a 3-d nest on the top. I've improved it with a couple of felted eggs in the nest.
Here are all the "babies" I made today. I picked up random broken chains at the fiber fair this weekend to make charming little fobs with which to hang them.
Here they all are hanging...
Here are the backs...
I'm very pleased with what I've come up with so far. Let me know if you have some ideas.
Since I've been waxing encaustic (pun intended!), I realized that these little blocks would make perfect canvases for some mini encaustic art pieces. Wax is heavy and brittle, which makes wood the perfect foundation. I literally felt a light bulb go off in my brain. I could create encaustic ornaments using my own photos for the 212 Art Center's Holiday Sale.
This is the story of the birth of my block ornaments. You've seen my first attempt with a larger block with the letter "N" on the front and a 3-d nest on the top. I've improved it with a couple of felted eggs in the nest.
Here are all the "babies" I made today. I picked up random broken chains at the fiber fair this weekend to make charming little fobs with which to hang them.
 |
| These photos are all from shots I took of birds in my yard. I took the liberty of adding red berries onto whatever tree or shrub they were perched on regardless of the actual species! :) |
Here are the backs...
And another view...
Sunday, October 27, 2013
Encaustic Marathon
Today I was in a creative zone with several encaustic pieces; new and in progress. I finished 4 completely today. I had one already complete and I have one in progress on my desk.
I remember reading about encaustic a year or more ago but it seemed too intimidating to attempt. Until...I started noticing beautiful pieces in gallery's and little art stores. The effect was ethereal and one I could never duplicate in another medium.
At first, I toyed around with heating a block of beeswax in a small crock pot. Although I was happy with the results I obtained in the following inchies, I was too limited by the one effect. I wanted more options.
When I came across an encaustic class taught at 212 Art center, I jumped at the chance to really learn about this elusive art form. Rob was a great instructor and showed us several techniques to try. However I got stuck on my practice board and never finished the the two full size boards we were provided.
Today, I transformed my unfinished full size board from this...
To this...
The stone or egg shapes are from some lovely fabric I found at Quilting Seasons, a small shop in Saline. I loved the fabric so much, that I also used some in this piece...
A small encaustic piece I finished a couple of weeks ago was enhanced by some interesting snap trim I added...
This late summer we had an art camp. Lucky for me, Rob was teaching a mini encaustic course. I signed up, of course! It was wonderful, because I had time to try new techniques that I didn't have time to in his original class. This is what I made...
The last piece I started and finished today is my favorite. I used a medium copper printing plate I had picked up at a antique store for $5. I didn't know what I would do with it at the time, but the copper printing plate was too fascinating to leave behind!
Using my own photographs, I turned it into this piece of collage...
I have so many ideas and techniques I still want to try, so stay tuned for more encaustic to come!
I remember reading about encaustic a year or more ago but it seemed too intimidating to attempt. Until...I started noticing beautiful pieces in gallery's and little art stores. The effect was ethereal and one I could never duplicate in another medium.
At first, I toyed around with heating a block of beeswax in a small crock pot. Although I was happy with the results I obtained in the following inchies, I was too limited by the one effect. I wanted more options.
When I came across an encaustic class taught at 212 Art center, I jumped at the chance to really learn about this elusive art form. Rob was a great instructor and showed us several techniques to try. However I got stuck on my practice board and never finished the the two full size boards we were provided.
 |
| Night Bird is my practice piece from my first encaustic class. I used a photo transfer technique with photo copies of a photo I took of a bird and had manipulated in Photoshop. |
Today, I transformed my unfinished full size board from this...
To this...
The stone or egg shapes are from some lovely fabric I found at Quilting Seasons, a small shop in Saline. I loved the fabric so much, that I also used some in this piece...
A small encaustic piece I finished a couple of weeks ago was enhanced by some interesting snap trim I added...
This late summer we had an art camp. Lucky for me, Rob was teaching a mini encaustic course. I signed up, of course! It was wonderful, because I had time to try new techniques that I didn't have time to in his original class. This is what I made...
 |
| This poppy is a carving, filling, and scraping technique. I was really pleased with how it turned out. |
The last piece I started and finished today is my favorite. I used a medium copper printing plate I had picked up at a antique store for $5. I didn't know what I would do with it at the time, but the copper printing plate was too fascinating to leave behind!
Using my own photographs, I turned it into this piece of collage...
I have so many ideas and techniques I still want to try, so stay tuned for more encaustic to come!


